STITCH TRIAL SAMPLES FOR MY FACE DESIGN

My cardboard design of a face or mask shows three areas that need to be translated into fabric using manipulation and hand stitchery methods or a combination of them.
These areas in paper have different textures and are respectively light (Area 1) medium (Area 3) and dark (Area 2) in colour, moving from a creamy white to a warm dark grey.

Area 1 – Light colour
Area 1 includes the front and the bigger part of the face. They are going to be worked in the same way but shall be placed on different levels.
Sample 1 – Manipulated technique: wadded quilting on habotai silk with the addition of a few patches of hand stitched fabrics (tulle net, jersey, cheesecloth) and wool yarn

Sample 2 – Hand stitching: manipulation by needle-formed pleating plus embroidery

Sample 3 – Needle-formed pleating, snipped tucks, hand embroidery

Area 2 – Dark colour
Area 2 although smaller is important for creating a contrast. The eye and the lower half of the face are going to be dark and visually “heavy”.
Sample 1 – Manipulated technique: short tucks in all directions on a collaged background fabric, machine embroidery added

Sample 2 – Hand embroidery: Buttonhole stitch

Sample 3 – Zig zag gathering over a linen thread, wrapping over ridges with variegated thread and darning stitch all over

Area 3 – Medium colour
This area makes up the background or frame of the face. It is going to be split into three slightly offset parts and perhaps these shall be placed on different levels.
Sample 1 – Hand embroidery: Cretan stitch

Sample 2 – Manipulated method: chequered irregular tucks and hand stitching

Sample 3 – Machine wadding on muslim

After a lot of comparing and matching and considering and agonizing I have selected which samples are going to make up my face. All and every sample have their good and bad reasons for being chosen or not chosen.
I now think samples shall be used as follows:
Area 1 - Sample 3 – This is a wide and prominent area and I want a highly textured method with a wide array of possible variations. I feel this combination technique is very flexible and I am not going to be bored!
Area 2 – Sample 2 – I love the other samples too but I feel that as a contrast to area 1 I need a much flatter, darker and more finely workable surface such as that of sample 2
Area 3 – Sample 3 – Also this choice was difficult. I must say I am attracted to atmospheric sample 1, but it seems to me rather too similar to that chosen for area 2 even if the techniques used are different. I also feel that an important background might draw attention away from the face. So I think I am going to choose sample 3 over sample 1 since it is more muted and subtle. Unless of course I change my mind in the making …. or a I find a way of combining features from both samples.
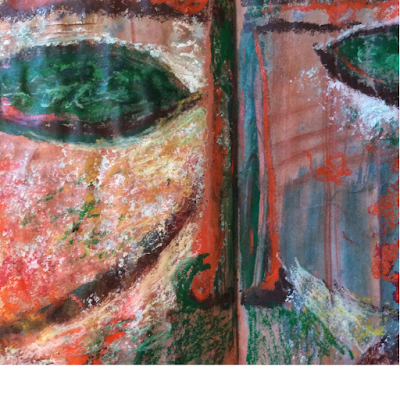
In this last photo I have placed my chosen samples on the mock-up for a first idea of how they might look. Before getting on I am going to make some experiments with the supporting structure.

These areas in paper have different textures and are respectively light (Area 1) medium (Area 3) and dark (Area 2) in colour, moving from a creamy white to a warm dark grey.

Area 1 – Light colour
Area 1 includes the front and the bigger part of the face. They are going to be worked in the same way but shall be placed on different levels.
Sample 1 – Manipulated technique: wadded quilting on habotai silk with the addition of a few patches of hand stitched fabrics (tulle net, jersey, cheesecloth) and wool yarn

Sample 2 – Hand stitching: manipulation by needle-formed pleating plus embroidery

Sample 3 – Needle-formed pleating, snipped tucks, hand embroidery

Area 2 – Dark colour
Area 2 although smaller is important for creating a contrast. The eye and the lower half of the face are going to be dark and visually “heavy”.
Sample 1 – Manipulated technique: short tucks in all directions on a collaged background fabric, machine embroidery added

Sample 2 – Hand embroidery: Buttonhole stitch
Sample 3 – Zig zag gathering over a linen thread, wrapping over ridges with variegated thread and darning stitch all over

Area 3 – Medium colour
This area makes up the background or frame of the face. It is going to be split into three slightly offset parts and perhaps these shall be placed on different levels.
Sample 1 – Hand embroidery: Cretan stitch

Sample 2 – Manipulated method: chequered irregular tucks and hand stitching

Sample 3 – Machine wadding on muslim

After a lot of comparing and matching and considering and agonizing I have selected which samples are going to make up my face. All and every sample have their good and bad reasons for being chosen or not chosen.
I now think samples shall be used as follows:
Area 1 - Sample 3 – This is a wide and prominent area and I want a highly textured method with a wide array of possible variations. I feel this combination technique is very flexible and I am not going to be bored!
Area 2 – Sample 2 – I love the other samples too but I feel that as a contrast to area 1 I need a much flatter, darker and more finely workable surface such as that of sample 2
Area 3 – Sample 3 – Also this choice was difficult. I must say I am attracted to atmospheric sample 1, but it seems to me rather too similar to that chosen for area 2 even if the techniques used are different. I also feel that an important background might draw attention away from the face. So I think I am going to choose sample 3 over sample 1 since it is more muted and subtle. Unless of course I change my mind in the making …. or a I find a way of combining features from both samples.
In this last photo I have placed my chosen samples on the mock-up for a first idea of how they might look. Before getting on I am going to make some experiments with the supporting structure.


What a lot of work you've done on this Daniela. I'm looking forward to seeing the end result!
ReplyDeleteHi Meg! How are you doing? Working on something special?
DeleteHi meg! How are you doing? Working on some new project? Attending new courses?
DeleteYour samples are lovely Daniela, very subtle colouring, little art works on their own. Great stuff!
ReplyDeleteHallo Helen, this module seems never ending! Are you flying from Sidney to Summer School?
DeleteHi Danni - what scrummy textures, the final mock up looks really exciting.
ReplyDeleteHi Daniella
ReplyDeleteWhat intriguing work, I look forward to seeing more!
Carrie